Tuesday, November 14, 2017

Council Approval For Shed Builders- A Step-By-Step Guide

Many people who are looking to build a shed naturally have questions about how the process works. And one of the main questions we get is, “How does council approval for sheds work?”. This article answers all the questions we get around council approval so you can build your new shed with a minimum of hassle.

Scope of this article

This article is focused on approvals for “Class 10 Buildings”, or in other words, non-liveable sheds. The rules for “Class 1 Buildings” (i.e. granny flats, liveable sheds etc.) are different and are not intended to be covered by this article. (See this article on Class 1 Homes vs Class 10 Sheds for more information on the distinction between the two classes.)

This article also covers the general council approval process that applies throughout Australia. It’s essential to contact your local council to get the details of the specific process that applies in your area.

When is Council Approval for a shed required?

The first question we’re often asked is, “Will I need council approval for my shed?”.

These days, council approval is nearly always required.

Different states and councils do have some exemptions, but they always have lots of conditions. So it’s always best to check with your local council before going too far.

While council approval may seem like a hassle, there are some very good reasons to get council involved before you start laying your concrete slab or erecting your shed. Here are three to start with:

  1. In a worse case scenario, council can make you take an unapproved shed down and remove any concrete or footings.
  2. Getting retrospective approval after you’ve already built your shed is almost impossible. The best option is to get a permit not to have it demolished. We have heard stories from shed builders who have gone through the process of getting permission to keep non-approved buildings standing. Sometimes the process can take several years. In one case, the person had to spend over $100,000.00 in engineering reports, application fees and various rectification work to get the building to the required standards. This is the type of hassle that can be easily avoided.
  3. The biggest reason to obtain approval, is that when you sell your property, part of the conveyancing process is to get confirmation from council that all structures are approved and built to conform with all regulations. Without the correct approvals, the purchaser can withdraw from the sale and get their deposit back.

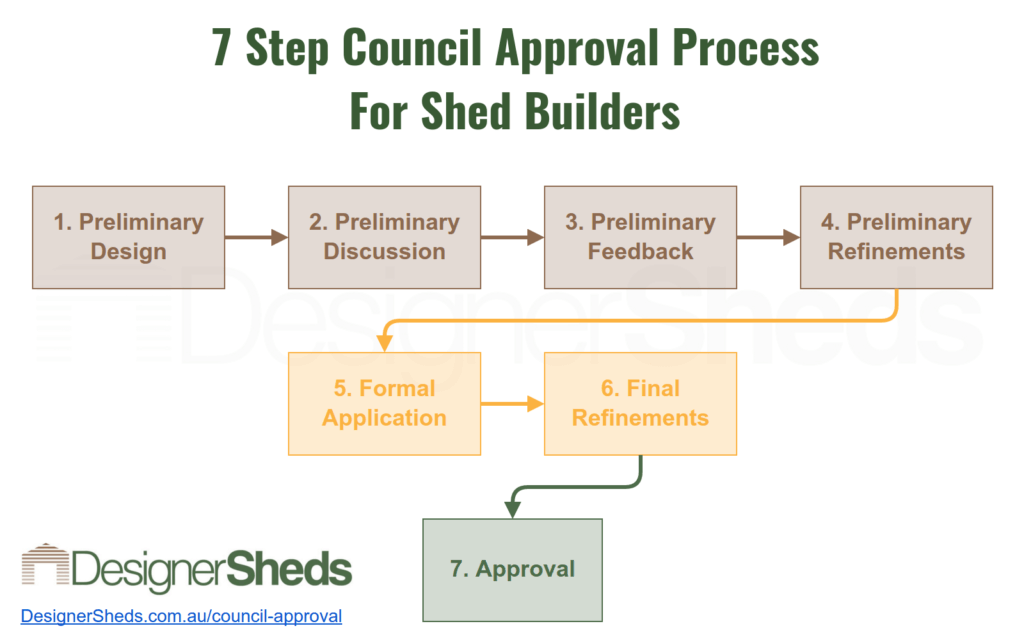
The 7-Step Council Approval Process For Shed Builders

Here’s the process we recommend for getting your shed approved with a minimum of hassle:

  1. Preliminary Design: get a preliminary shed design drawn up (we offer a free service to do this for you).
  2. Preliminary Discussion: Once you’re happy with your design, get in touch with your local council to start a preliminary discussion (see below)
  3. Preliminary Feedback: Council may give you feedback which will affect your design and may require some design modifications – or they may indicate your design is likely to be compliant (happy days!)
  4. Preliminary Refinements: Make the necessary changes to your preliminary design (again, this is free of charge when you take advantage of our shed design and quote service).
  5. Formal Application: Put your plans into council for as part of a formal application. If you’ve done your homework, approval should generally be straightforward.
  6. Final Refinements: if the council has any further requests for changes, tweak your design and revert back to council – although if you’ve followed steps 1 to 4, you shouldn’t have much to do here.
  7. Approval: Once approved, you’re ready to order your shed and start building!

Shed Council Approval Process

Now you know the overall process, let’s drill down into a couple of areas that we get a lot of questions about:

More On Step 2: Holding Preliminary Discussions With Council

Step 2 of the process is to hold a Preliminary Discussion with council.

Most councils will allow you to arrange a meeting with their building inspectors on your property and discuss:

  • What type of shed you have in mind
  • How you plan to access the building
  • What you intend to use it for

If they won’t meet you on site, you can always meet them in their office. When you attend a Preliminary Meeting, it’s important to bring two things:

  1. A site layout plan showing the boundaries and dimensions of your block. You should have received a site plan with the conveyancing paperwork when you purchased the property or with the approvals for any previous developments you have had done. Failing this, for a small fee, you can get a copy of the last approved plans the council has on file.
  2. A Preliminary Design, or at the very least a sketch of the shed you propose.

We’ve found that if you get the inspectors involved right from the start, you can ask for their help in getting your council application correct on the first go.

This makes both your life and their job a lot easier. Usually they are only too happy to help point out any issues they foresee, and how to address them.

More on Step 5: Formal Application To Council

Step 5 is making a Formal Approval Application To Council.

  • The first step is to find out how your council or certifier accepts applications. Whilst most applications are still in paper form, a number of councils now insist on the application being in electronic format.
  • You’ll need your shed design documents to attach to your application. These include:
    • Engineering documents, covering the shed and concrete slab or footings
    • Plan View of your shed
    • Elevations suitable for council submission
  • You will need to provide a Site Plan (see above)

Once your application is lodged, you’ll either get an approval, a request for changes, or a rejection.

More on Step 6: Final Refinements

If you do steps 1 through 4 thoroughly, then you will usually find that your shed approval sails through council. However, sometimes council will request some revisions to your design in order to grant approval.

This could be due to easements, sewer line locations being different to submitted plans, power line locations or other factors.

This means going back to your shed company to tweak your design plans and re-submit to council until they are happy.

If you need to tweak your design, we’re happy to help you with this at no cost.

Sometimes, shed builders are disappointed to find that the type of shed they want to build will not be approved by council.

We recently worked with a customer to design a magnificent custom shed with a wall height of 3.9m and 160sqm in area.

Unfortunately, council stipulated that sheds in their suburb may only have a maximum wall height of 2.4m and be up to only 60sqm in area.

The customer had to unfortunately give up their dream of having that shed on that property… but they’re currently looking for a bigger property elsewhere!

When is your shed exempt from Council Approval?

There are some cases where your shed is exempt from council approval. This varies from state to state and even council to council.

If you go to your local council and there is an exemption for what you are wanting to build, they will let you know.

If possible, get something in writing to say your proposed shed is exempt (even if you have to pay a fee). That way you can keep it on file in case there are any questions or problems in the years to come.

Whatever you do, don’t just take the advice of a neighbour, friend or salesperson to the effect that “you don’t need approval for sheds around here”, as the consequences are too severe.

Many times we’ve had customers tell us they have been “told” they don’t need any approvals, but when we do the proper checks, we find out they do.

In NSW, for example, there is an exemption for farm sheds on rural land up to 200m2, but there is some important fine print: the shed must be “ancillary to an agricultural activity”. That is, it must be solely used as a part of a working farm. If you put your caravan or boat in there, the shed is not exempt.

In another case, we had a client wanting to build a shed on their rural-zoned block to store their tractor and trailer that they used to keep the land maintained. This shed was not exempt as there was no “agricultural activity” on the land. A couple of cows to keep the grass down didn’t count.

There are also a many other clauses that detail other potential reasons why a building may not be exempt, such as acid sulphate soils, presence of indigenous artefacts, heritage orders, distances to boundaries or neighbours dwellings – to name just a few.

Bottom line, check with the council or a private certifier, just to be sure. Then if they say you’re exempt, get it in writing.

Should you use a Private Building Certifier?

The role of a Private Certifier is to make gaining council approval quicker and easier. They are not available in some areas or states but when they are, they can be a good option.

They follow the same rules and guidelines as the council inspector, but are usually very knowledgeable about shortcuts and exemptions as well.

They check all necessary regulations, confirm all your paperwork is correct and issue the approvals. They can also perform all relevant stage inspections, then issue the final occupation certificate as well. Finally, they provide council with all the completed paperwork and approvals for their records.

In some cases, council may check your advise that approval isn’t required, but will not give you anything in writing for your records to that effect.

This is also where a Private Certifier can come in handy. A letter from them saying they have checked your plans and current regulations, and are satisfied that approvals are not required, which can give you added peace of mind for the future.

Conclusion

If you can develop a good rapport with your local council or a private certifier right from the start, the council approval process for sheds is actually simple and straightforward.

While it may be tempting to not seek approval (particularly in rural areas), the ramifications down the track will always be much worse and a lot harder.

Ready to take the next step?

If you’re ready to embark on Step 1 and get your Preliminary Design drawn up, get in touch for a free shed design and quote session with one of our expert Shedologists.

We’ll email you your preliminary shed plans, suitable for Step 2 (Preliminary Discussion with council).

Then once your design is finalised, all you have to do is pay a 10% deposit on your shed kit and we’ll supply all the final plans and engineering documents you’ll need for Step 5: Formal Application.

At any stage along the way, if you need to tweak your design, we’ll be happy to do that for you – at no cost.

Good luck getting your shed approved – and here’s to your best shed ever!

The post Council Approval For Shed Builders- A Step-By-Step Guide appeared first on Designer Sheds.

Wednesday, October 18, 2017

The Complete Concrete Slab Guide For Building Your Ideal Shed

One of the most common topics we get asked is how to create the perfect shed concrete slab.

When building any kind of steel shed – be it a garage, workshop, garden shed, storage shed, equine shed or commercial shed – then the strongest and most durable flooring is the trusty concrete slab.

But when it comes to laying a concrete slab for your shed, it’s important to get it right. If you don’t know what you’re doing, you’re likely to waste a lot of time and money… and create headaches for yourself.

So with this guide, it is my intention to provide you everything you need to know to correctly lay the perfect concrete slab for your shed.

Before we begin, let’s start with a warning:

Don’t lay your concrete slab in advance!

Before even thinking about forming or pouring your slab, we STRONGLY recommend that you finalise your shed design first.

Don’t assume, “I know what I want so what’s the harm in laying the slab now?”.

Sheds designs that are still in the planning stage are much more flexible than concrete slabs that are already in the ground!  

And your concrete slab will have to match the engineering of your shed.   Every brand of shed uses a different engineered design for footings, edge beams and so on.  So unless you have the finalised design, these will never be in the right place.

Shed designs are a lot more flexible than concrete slabs… and if it turns out you have the wrong sort of slab for you shed, with the wrong thickness or dimensions, then it can cause problems you just don’t need.  

So if you haven’t already done so – don’t lay your concrete slab until you’ve finalised your whole shed design.

Contact us for a Free Shed Design & Quote Session if you’d like help with your design.

Typical shed concrete slab dimensions

The right dimensions for your slab are critical.

Minimum dimensions

Your slab can be as small as the shed that’s going to sit on it.  With the sheds we make at Designer Sheds, the minimum slab size is usually 2m x 2m (there may be some that are a little smaller… contact us if you have a smaller requirement).

Maximum dimensions

Again, a big shed needs a big slab.  For example, our biggest shed has a 24m span and can be as long as you like.

BEWARE of “nominal sizing”

While many shed manufacturers may claim their sheds are a certain size, some shed companies use “nominal” sizing – which is another word for approximate sizing.

We once came across a national chain that referred to one of their sheds as a 9m x 6m shed. But when we got out the tape measure, the actual size was just over 8.4 metres by 5.9 metres. So you wouldn’t want to lay a 9m x 6m concrete slab and then find out that it was the wrong size!

With our sheds, your actual shed size will exactly match the slab size you require.  

That being said, where practical, there can be efficiencies from matching your shed size to the standard dimensions of steel sheets.  So again – it is important to settle on your shed design first, before thinking about slabs.

The right shed slab thickness

The right concrete slab thickness is critical.

A thin, brittle slab will crack under the weight of the shed and what you put in it.  And an overly thick slab will cost more than it needs to and be more difficult to put in.

The minimum concrete slab thickness we recommend is 100mm.  This will be adequate for light / normal use – such as parking cars or caravans, as well as storing workshop equipment and the like.

However, if your application is heavier (such as storing heavy machinery or heavy vehicles in your shed), then a greater thickness is required and/or additional steel reinforcement.

If you speak with your shed consultant, they will help with some advice on the correct thickness for your application.

Another main factor in slab design is what type of soil you are pouring it on. So let’s talk about…

Soil classifications

One thing you must consider is if the soils in your area are reactive or not.  A reactive soil will expand when wet and shrink when dry, causing movement in the ground.

The different classifications are listed below. If you have a soil type H, E or P, you would probably already know about it. The further down this list you go, the more likely the soil is to be “reactive”.

Special building techniques apply to reactive soils. As you can imagine, shifting soils will cause serious damage to the slab and building if not done correctly.

The potential problem only gets worse after you have laid your slab. This is because with a lot of rain, the soil around the slab gets wet and expands, while the soil under the slab stays dry and doesn’t expand.

Soil testing for reactive soil

If you are in an area that has reactive soil, it’s easy to engage a soil testing service to test.

You can send your soil test report to your shed consultant, and they will get their engineer to advise what, if anything, needs to be done to strengthen the slab to withstand the additional forces.

The cost of a soil test usually a few hundred dollars, depending on where you are located.

Keep in mind that if there are already other buildings on the property close to where the shed will be built (particularly a house), then a soil report will have already been done, and can be used for your shed.

Is your site level?

The next thing to do is to find out how level your site is. Over the decades we have had many people tell us their site is “flat”.

However, there is a distinct difference between “flat” and “level” (a wall is flat, only vertical).

Even an experienced eye can be deceived by variations in falls. Any good concreter these days has a laser level. Their quote should include inspecting and measuring the site to ensure it is accurate.

How to check if your site is level

If you want to check the site yourself, the simplest and cheapest way (if you don’t have access to a telescopic or laser level) is the humble string line level. These start from only few dollars at nearly all hardware stores.

Hang one of these over a tight string line to get a quick-and-dirty reading of how level your site is.

A string line level clips onto a string line that is pulled tight.

Then you fix the high end to a rock or tree, and lift or lower the other end until it shows level.  From there you measure from the string line down to the ground in several places.

We would not advise constructing formwork with a string level… but if you want to double check the estimates you have, it is more than sufficient.

Should you DIY, or hire a professional?

Some people wonder if they should lay the concrete slab themselves, or hire a professional.  

Our advice is: if you’re not a professional concreter, hire a professional concreter!

If you’re a very accomplished home handyman or handywoman, you may feel comfortable doing the concreting yourself.  Just bear in mind that the quality of your shed will be highly dependent on the quality of your concrete slab.  So don’t go into it lightly.  There’s a good chance you’ll struggle otherwise, and waste a ton of time and money in the process.

How to choose the right concreter

It is important to check that any potential concreter has plenty of experience with shed slabs.

Shed slabs usually have to be more accurate than slabs for say, a house, because steel doesn’t bend a whole lot if the slab is slightly out.  Whereas with a house slab, a bricklayer can do a few tricks to adjust for a slightly off-kilter slab.

So, quiz your concreter to see how much knowledge they have about concreting for sheds. You should quickly pick up if they are hesitant in any area.

Also, our advice is not to simply go for the cheapest quote, thinking they are all licensed and know what they are doing.

Ensuring your concreter is a member of an industry association such as Master Builders Australia (MBA) or Housing Industry Association (HIA) is a good start.

If you do have a dispute down the track, these associations offer quick mediation services, and will deregister any operator doing substandard work.

They will also refer and help you with any government building disputes service.

As a result, you usually won’t have problems.

Excavating the area

It is best to have your concreter organise and supervise any earthworks. They normally don’t charge for this service because it saves them a lot of time and effort if the job is done right the first time.

We have often had a customer get earthworks done, only to have the concreter turn up and say it hasn’t been done right.

This means getting someone back to do it again, costing more time and money.

Cutting and filling

Cutting refers to cutting out material from a slope to create a level surface.

And filling is the opposite – adding material to the ground to build up a level surface.  

With both cutting and filling, you should ensure you also level out at least 1 to 2 metres around the shed edge. This allows easy access to build the shed, and afterwards for maintenance of the shed and ground.

Leaving a generous level pad around your shed also prevents erosion, which can undermine your slab foundations.

Where to add concrete piers

A filled site will also mean any area of the slab not on natural ground will need piers through the fill down to natural ground at a maximum of a 3 metre grid, and under every column.

Concrete piers will support your shed in case the fill underneath your slab settles – reducing cracking and movement.

Concrete piers ensure your slab and shed are supported on solid ground.

Why your slab must be absolutely level

With the sheds we manufacture, all the components are precut to the exact lengths needed.  So if the slab is out of level, so will be your shed.

For argument’s sake, what would happen if your slab was off level?

Well, you would have to cut the columns shorter if they are on a part of the slab that is higher.  However, then the sheeting would overhang the slab a greater distance.

Roller doors in this area would then have reduced clearance – so if this is critical to fit a horse float or caravan, for example, then you would have big problems.

Also keep in mind that you will be able to see the whole shed floor from any location… so the flatter and more level it is, the better it will look visually.

So in summary – make sure your slab is absolutely level!

Ensuring your slab is square

Your slab also needs to be as square as possible – in other words, to have exact right-angle corners.

Otherwise, when you get to the roof, you will have trouble keeping the structure square and aligned.

The sheeting will also end up out of square to the rafters and purlins, and “saw toothed” or not aligned in the gutters and the apex… which doesn’t look good visually.

Here’s an overview of shed jargon, in case you could do with a refresher:

In case you need a refresher on shed jargon, this diagram will help!

How to protect yourself contractually

It’s important to have a signed contract for the work to be performed. The contract must be written either on the industry association’s pro forma contract, or the official contract of the licensing body in your State.

No reputable contractor would refuse such a request, because it is just as important for them in getting paid.

Also, NEVER pay anything upfront, and have someone check the tolerances before paying after completion.

Being perfectly level is a hard one to check without either a telescopic or laser level. But if you are concerned, it isn’t expensive to hire one or get your shed builder to check it all for you.

Your shed erector is the end of the line, and the further out it is, the harder it is for them. So it is in their best interests for all the levels and sizes to be correct.

How to check the job

  1. Measure all four sides of the slab. They should be all as per your shed size. 10 to 15 mm longer or shorter isn’t a real problem.. but anything more than this could be, depending on the size of your shed.
  2. Now, look down the four edges to see if they are straight. If you are concerned, pull a string line tight from corner to corner. There should be no more than about 10mm either in or out from the line.
  3. Finally, measure diagonally from corner to corner and write down what the measurement is. Then, check the distance between the other two corners. The two measurements should be close to identical. Up to 10 to 20mm for a small slab, and 20 or 30mm difference for a large slab is OK. Anything over that and things start to get difficult to build.

Preventing and minimising cracking

The nature of concrete is that it will develop some small cracks over time.

To combat this, our engineering specifies saw cuts at regular intervals to help limit visible cracking.

Saw cuts in your concrete slab can prevent cracking in other places.

The idea of the cuts is that hopefully the cracks will occur in the cuts, making them invisible. We also require key or doweled joints on bigger slabs to allow for expansion and contraction as this also reduces the amount and size of cuts required.

For larger slabs, doweled joints allow the slab to move slightly, reducing cracks in the process.

Don’t let the concreter try and talk you out of the joints or saw cuts: they do form an important purpose. After the slab has cured for a week or so, it’s possible to fill the cuts and joints with an appropriate silicone style filler to keep out small stones and gravel.

Summary

As you can see, building a slab for your shed is all about preparing properly, and having competent people doing the work. You’ll find your shed will be completely transformed by having the perfect concrete floor, but you need to follow the appropriate steps to achieve outstanding results.

So now that you know how to create the perfect concrete slab for your shed, you might be looking for the shed itself… and that’s where Designer Sheds can help.

If you want to find out more about the shed design process, feel free to download our Ultimate Shed Design Guide.

Or if you’d like some 1-on-1 help, request a free Shed Design & Quote with one of our expert Shedologists.

If you have any more questions about sheds or concrete slabs, give us a call on 1800 977 433 and we’ll be happy to help.

We also offer a Shed Advice Hotline for customers who are in the process of building their shed, so if your concretor or shed erector has any technical questions, help is just a phone call away.

The post The Complete Concrete Slab Guide For Building Your Ideal Shed appeared first on Designer Sheds.

Sunday, April 24, 2016

Basic Tips for Choosing a Garden Shed

Whether or not you want to have a space exactly where you can store your backyard garden equipment, outside tools, your bicycle, or creating a backyard retreat, an outside drop will arrive in handy. Garden sheds can store virtually every thing from out of doors tools to gardening materials. They can also provide as an location where you can apply arts and crafts or a playhouse for youngsters. This outdoor get rid of can also provide as a storage room that is simple and practical.


If you are thinking about acquiring a get rid of, you will be investing in a construction that can be extra to your home. With that mentioned, you will want to commit in some thing that is functional, simple to sustain, and will previous for several a long time. Here are a couple of suggestions to aid you pick the proper garden get rid of.

Purpose: Just before you begin looking into your backyard garden drop options, you should very first figure out what you need the shed for. Do you need it merely for storing backyard garden resources? Will you use it as a workshop region? Do you want it to be large enough to residence your car? Determining your purpose will assist you choose the dimension, configurations, and requirements of the get rid of.

Place: The subsequent point you need to determine out is exactly where you want to location the construction. It is advisable to have at minimum one meter of room around the outdoors of your outdoor structure to very easily accessibility and sustain it. You should also consider placing the drop in an region that is significantly less uncovered to the factors. For instance, you can consider developing the shed near a taller building or around a tree which can aid boost its toughness.

Read more on ShedPlansMaterials.Blogspot.com.